Tuesday 28 May 2013

Golf Bumper Part 1 (Rear)

Way back when i got my golf 5 years ago (bloody hell!) one job that was never done before it was put on the road was to fix the bumpers. Both front an rear had previously (before my ownership) had been knocked, very gently mind, but enough to twist the rear and deform the front plastic.


Here you can see the lumps and bumps of the rear in all their glory. As a result the right side bends up slightly and doesn't fit into the gap in the rear quarter panel, there by rubbing the body.


With the back of the car on axle stands the two bolts holding the bracket on could be loosened beneath the boot.


Naked as the day it was installed, at least if you ignore all the other parts still attached. The bumper came off fairly easily and slid out, ready for the new on to be installed.


Four bolts later and the new bumper is installed. Next job, source and fit a new front bumper to complete the fix.


Friday 24 May 2013

Pulled Pork in JD Honey BBQ Sauce - The BBQ Smoker Finale

The BBQ smoker last weekend was a resounding success and to round off the recent BBQ trend thread for the time being here's what happened to the pork. 

The joint cooked and came out looking, well pretty black. I decided i'd chop it into smaller chunks and serve it along with the other meat and heat it through on the BBQ itself with the burgers, when I had an idea!


A few weeks back i'd made a sauce for the THaTLAN BBQ. We marinated the left overs of the 6Kg rib challenge (that's another post entirely) a number of us tried the previous night in it and served it in cups as a sort of starter if you will.

So this time, instead of using 1l of coca-cola as the base, i took some advice form a friends brother who's a chef. I got some brown sauce as a base (in this case HP Guinness flavour) and put about 1/3 of the bottle in a pan with what was left over from a couple bottles of maple syrup (probably about 50-75ml at most), some malt vinegar, some honey and mustard sauce and the juice (and some flesh) of a large lemon.


The mix looked a little short, so after adding another dose of everything I had I'd increased the volume about another 1/3 and whisked it more.


Next i raided the cupboard for more flavours, not that it tasted bad, just it couldn't hurt to add more at this stage. The next lot was basically just a rummage to see what I had ending up with Basil, Parsley, Oregano, celery and garlic salt, onion granules, mixed herbs, and some liquid seasoning, sometimes called liquid smoke.


This, and more of the mustard sauce from earlier went in the pan, along with 100-150ml of coca-cola which I'd used to rinse the maple syrup and mustard jars out with to avoid wastage. The whole thing got whisked again and then left to simmer for half an hour with the lid on. Then all the pork was poured in and left another hour to breakdown. I also added some of the fat from the joint which was taken off and chopped it as finely as I possibly could to allow the flavours to mix in more. In addition to this I also put 3-4shots of Jack Daniels Honey Sour Mash in the mix before the meat was added, just to make it that little bit more delicious.


After an hour or so cooking down the pork started to break apart and formed more of a pulled, rather than chopped pork. The pan went outside to the bbq and got thrown onto burgers for the last few minutes before serving them.


All in all, i'll probably end up making this again and give some better measurements and more pictures, this was put together in about 20 minutes while guests were arriving and got a good reception. Maybe with more time to think about stuff instead of just doing it, it wont be as good or spontaneous, but we'll see.

Wednesday 22 May 2013

BBQ Smoker - v0.2

For version 2 (ok, 0.2) i swapped out the broken dish for a glazed one to hopefully give it more heat resistance and bought a pizza try which had holes throughout to lift the fire off the lower plate entirely. This also allowed air to come up through the base of the fire and burn far better.


Ideally i would have added holes to the saucer but wasn't sure if the lack of total protection form the eat would make it crack. Best try the first one without the holes and see what happens. At least its not wasted work if it does break now.

Took a while to get a decent fire going (as you can see by all the matches, which were dire and either broke striking or went out as soon as the head burnt) but once it went it kept a good temperature. For this one I used some scrap wood, but amde sure it was actual wood, rather than mdf/chipboard.


Because this time it was getting food! It generated a good amount of smoke, but having a very limited supply of wood at this point, it was never going to cook the whole chop.


The lid went on and then i decided to move it off the BBQ, party because i didnt want to melt the cover and party because if it toppled, maybe something would survive and lower fall.


The fire burned for about 40minutes, an the chop good cooked through on the George Forman along with another chop which hadn't been in the smoker as a comparison.

The difference in flavour was noticable even after only a very short time cooking in the smoker itself, so some success at least.

Monday 20 May 2013

BBQ Smoker - v0.1

[From-the-archive-of-things-didnt-post-at-the-time: This post should have gone out last year, but didn't and as i've not improved it, and used it with success. It's about time]

For a while I've been wanting to try some different styles of BBQing. One specifically sounds and looks more delicious - slow and low.

Its fairly simple: Make fire, direct smoke over meat, leave for some time, tend fire as needed.

Firstly, the fire. Most large scale smokers in the US have a brick fire box and large metal box with shelves or racks four the meat. But, that's a tiny bit impractical. B&Q provided the answer, somewhat unexpectedly. A large thick walled plant pot upturned on a saucer makes a good firebox and another pot on top with wire racks for holding the meat.

The pot needs a hole cut for fuel and air to get in. Fortunately, the clay pot is soft enough a dremel eats it away nicely.


Sadly the enamel pattern is somewhat harder and took as long to cut through as the rest of the pot.


Once the hole is cut the inside of the pot and saucer got a liberal coating of fire sealant and the saucer had some holes drilled at the edge to draw air in.


Unfortunately about 15 minutes into the fire test, the saucer shattered down the middle. The pot at least stayed intact which as it took the most work is probably for the best.


The new saucer has enamel which should resist the heat a little better and i've got a pizza tray for the next test to lift the fire up to get air under it as well as maybe keep the saucer from breaking.

The top of the smoker is a straight sided pot, with a bell pot upturned to trap the smoke inside. To hold the meat up, i've made a rack from a couple of dish racks for a microwave. Soon i'll get some proper fuel for it and test it for a full cooking time on something.


Saturday 18 May 2013

Baked Alaskan Rasberry and Chocolate Chunk Brownies with Chambord

Whilst making this cheesecake for Norway Day we had to go to Tesco to get some supplies (namely food colouring). While wandering about the home baking section I had an idea to use up some remaining raspberries which has been frozen. While i didnt plan on making it tonight, when we got back form Tesco I had a couple drinks and half midnight seemed like a perfectly reasonable idea while I waited for the cheesecake to bake.

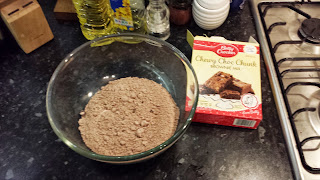
So heres the mix,m again, its premade, but i'm going to make it better.


The remaining pot of raspberries, delicious and defrosted.


The dry mix didnt look to have many chunks, so I improvised and found some Dairy Milk minatures in the chocolate tin. You used to be able to get a dispensing machine for kids to play with for these. Mine took 2p coins and dropped out a bar for each one. You could load half a box at a time and it made it last a bit longer, until you worked out how to unload all the coins again and just run them through or take the back off. But thats no fun.


Half a pack of those chopped into thirds made a nice pile of decent sized chunks.


Again, the mix needed and egg, some oil, and some water. Instead of water I added what was left of the chambord (just over a shot) and the raspberry mess


The mix was a bit thin due to the extra liquid from the fruit, so a few teaspoons of flour were added to bulk it out. Forgetting to use the sieve was probably an error...


... But part 1 of the instructions saved the day


The cheesecake had to be cooked in a hot water bath, and the only tin I had was an oversize cake tin. This turned out to be cakemix tight, but not water tight, so the pan I intended on using for the brownies was acting as a drip tray to stop the bottom of the oven being covered in water. As it happened the leaks were far from bad and what little escaped evaporated pretty fast.

Because of this, while I was waiting to get the pan back I had more free time, and what seemed like a good idea was to use the two egg whites left over from the cheese cake and try and make a meringue. Having never done so, and it being 1AM, i elected not to use the mixer and just put in some elbow grease.

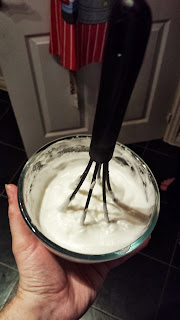
First it got whisked to a foam and then gradually added caster sugar so as not to make it collapse. After about half an hour, heres the results. Firm enough to stand the whisk in and forming soft, but fluffy peaks. First attempt and making a meringue, first success.


In the mean time of finishing the whisking to end all whisking the cheesecake stopped leaking enough to retrieve the pan and line it with baking paper. The mix went in and hid under the other try catching the drips so it didnt get wet and would crisp nicely. After 20 minutes the brownie tray came out and I decided to put a layer of the meringue on the top as they were a bit thin at the edge.


There was just enough form the two egg whites to cover it.


Finally it went back in the oven to turn the outside a golden brown.


Friday 17 May 2013

The Great Norwegian Cheesecake-capade

Today (May 17th) is Norwegian Constitution Day and as Sue is Norwegian, we must celebrate! In this case, she has decided we're to make a tri-colour cheese cake for the occasion and for the BBQ this afternoon. So last night became something of an escapade while making it and spawned a number of other things too.

Most cheesecakes have a crushed biscuit base, but this seemed a little tame for our adventurous step into the world of crazy cheesecakes. After a few different ideas, we settled on COOKIE DOUGH!


Being a bit rushed, we decided to use a dough mix, and make it better. The mix called for an egg, some oil and some water. Instead of water, we used a water substitute for extra flavour. After mixing, it looked a little dry, better add more...


RUM! Far better than water.


The mix came together much better and filled the tin about 1/4" deep.


The cheesecake mix was a pretty standard affair from the BBC site, with 900g of cream cheese, 3 eggs (plus 2 yolks), some creme fraiche and vanilla extract.


Mmm, gloopy.


To make the tri-colouring effect the mix was split into three bowls, and then food colouring added. At least it would have been, if I'd had any in the house. On closer inspection of the baking cupboard, the food colouring had disappeared, so we used whatever we had, That turned out to be alcohol!

The red was made with Chambord and when that wasn't enough (just a pale pink) some blended frozen raspberries from the freezer. The white was pretty simple, but so as not to spoil a good idea, Absolut Citron went in along with some lemon peel. The blue was... troublesome. While I had a lot of blue curacao in the bar and it did start making it a pale blue, the more that was added, the greener it got.


At this point, the red is looking ok after roughly half the chambord and frozen raspberries, plus some potato flour to rethicken the mixture. The white is looking as white as ever, really a sort of pale cream colour, and the blue is still pretty green and thin. More potato flour fixed the consistency, but obviously not the colour.


After an 11pm trip to Tesco Newbury we came back with blue food colouring, among other things (more on that later), and the poring could begin.


The first two colours worked perfectly, nice concentric circles, but once again, the blue wasnt done with trying to screw me. It was still a bit too thin and going into the fairly thick white layer it spilled over the top a little and didnt stay confined where it was poured. In retrospect it should have gone in before the white, or been thickened more.

But on the plus side, it did bake pretty well. 10 minutes at 180C, 40 minutes at 140C and then 10 more about 160-180 to set the top a little more.


Hopefully by the time you're reading this, i'll have cut it and can see the results of the pour in cross section. If it worked, hurrah! if it didnt, at least i've got a reasonably boozy cheesecake.

Thursday 16 May 2013

Golf Audio - Part 1

For those that don't know, I've got a Golf. Its pretty heavily stripped out for track use. Because its stripped out, it was also the easiest thing to install a spare sub into I had laying around. The sub's been through quite a few car's i've owned since the mid 2000's, but nothing was this easy to do (the first time).

Adenau - Nurburgring
There's no before picture, because i didn't think (surprising how often i forget and just start working on something before i decide to write anything up). Previously there was a false floor over the spare wheel which the sub sat on, and this worked fine until the space saver i had in there, turned out to be fractionally too small to fit the front wheels. A full size alloy meant the floor didn't sit properly and it slid off, so it needed to be fixed.

Instead of putting the floor back and raising it up, it seamed more sensible to move it forwards to make the wheel well and general boot area easier to get to and use. People said stripping everything and then putting this in was a waste of time, but given its removable when i'm on track, and the drive to and from the track is pretty monotonous with poor sounding music, i don't really care :D.

This is the back of the car as it was.

The back 'seats'
Lacking a big enough sheet of wood to make a new floor, I used the old one.


The biggest issue was making sure the new seat belts would clear the eventual location, even though they're not in yet, i don't want to have to change this later.


More shaping and securing the floor together...


The floor will probably end up getting something stuck under it and need to be removed, so needs to be removable, and as I cant get under to hold one side, I've had to make pins to bolt to.


The pins stick just far enough through for a wing nut to go on the top without leaving thread sticking out.


Behold! It fits.


The old covering was re-purposed and doesn't look too bad, its not perfect, but it works.


Test fit! Still fits...


Perhaps not my most flattering angle, or the most comfortable position to work in.


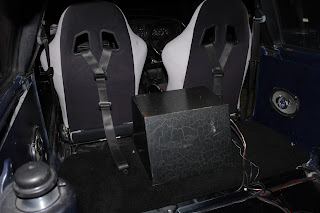
As is evident by the darkness outside, this took a while to finally wire and bolt in, but it worked and the boot is massively more useful now I don't have to reach over the top of the sub.


Eventually i'll put the ooooold build log up of the car. Maybe.