Third post of the day, perhaps mark it on the calender...
The first batch of Cider was a resounding success, but as its no longer apple season, buying loads of apples and crushing them isnt cost effective or fun outside in the cold (this was done in February, despite only being posted about in May).
So as some friends had successfully tested, using cartons of apple juice works just as well.
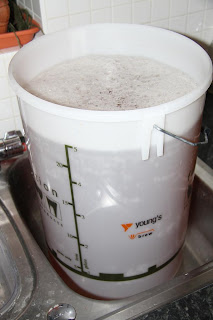
With this in mind I got two slabs of apple juice, 2KG of brewers sugar and a packet of yeast and started emptying the cartons into the brew bucket.
With the brew bucket full with roughly 5 gallons of apple juice, i forgot just how heavy it was, and in retrospect, shouldn't have filled it in the sink.
The SG of the contents was a bit low, so a kilo of the sugar got added to in theory bring it up to around 7-8%. Not as strong as the last brew (which was about 10%) but enough to be merry.
The bucket got put under the bar into a small tray in case of leakage and ignored until this week.
So the sugar has all fermented and its tastes pretty good, not quite as dry as the first batch, which is good.
Some of it's going to be bottles and fermented a second time to get some fizz, but the bulk is in the keg to be stored and poured as needed.
Once i've bottled it i'll post more about it.
Friday, 18 May 2012
Trek Table
In a posting frenzy, today i present to you, the Trek Table.
After a night out in Reading a friend (Kat @geekonaleash) noticed a table in the bar we were in in the shape of a shirt badge and immediately began pining for it.
With a birthday coming soon i said i'd make one for her (foolishly) not having a full plan of how to do it.
First job, design and template. The design is fairly easy to copy and scale up with some subtle teaks to make it a bit more useful as a table.
Next a hardboard template for the router to follow.
Next (and i forgot to take a picture of the first part of this) cut a rough shape from two pieces of 18mm MDF which were glued together to make a substantial chunky top and clamp. You can never have enough clamps.
Once its dry, add the template and route it.
Success! One neatly trimmed table top! The next step was to route the edge over to make it slightly less sharp with a 45 degree chamfer.
Add legs and varnish, and done!
Fairly successful and reasonably sized table. I would have liked to have angled legs, but this would have posed two problems. One, the legs would be a pain to mount in a secure way and two, if someone were to inadvertently sit on it, the legs would splay out and rip them off. So no.
The Kebzaritto - In Pictures
The last update in March promised a visual delight of the Kebzaritto, and here, only 2 months later is the results from that night.
The Kebabs, mine on the right, with ALL the meats and XXL moniker.
The cross section of this doesnt really do it justice as it was only an end which was fractionally less packed than the middle but still had most of the bits on display.
Lets just say it was challenging to eat.
But. ENTIRELY worth while.
The Kebabs, mine on the right, with ALL the meats and XXL moniker.
They're pretty sizable as you can see, and chuck full of stuff.
Unfortunately the people at Papa Johns failed slightly with the pizza order, when i requested that the pizza's not be sliced, they did anyway :( so it made the final monster somewhat unstable to be held in one piece.
It also meant that some skewers had to be sued to hold bits of it in place...
...As well as a steak knife when we ran out of skewers.
The cross section of this doesnt really do it justice as it was only an end which was fractionally less packed than the middle but still had most of the bits on display.
Lets just say it was challenging to eat.
But. ENTIRELY worth while.
Subscribe to:
Comments (Atom)


