One month into the new place and getting everything back to where it was before had been a mission. With the likely short time here, a lot of projects are a bit lacking in purpose so anything thats being done is limited to things which will move with me to the next house.
While I get round to starting the various ones I can do, I'll post ones from the last place which were at least useful in some way and will probably be repeated when i move somewhere more long term.
The biggest of these will likely be the Camera Jib (from waaaay back), the Golf and some stuff on the desk. There'll probably be more when i remember things I need to do.
But first, flash backs!
Showing posts with label camerajib. Show all posts
Showing posts with label camerajib. Show all posts
Wednesday, 8 October 2014

Saturday, 22 October 2011
The Jib - Cables
Originally the jib was going to have a single cable but that changed to a twin setup, partly for failure redundancy and partly to take out twist in the truss when its loaded.
Each end attaches to a small surface eye from a chandlers bolted onto the steel handle at one end and the aluminium truss at the other.


The rest of the hardware is also from a chandlers. The wire is slightly thinner than originally planned (2mm instead of 4mm shroud wire) but is still capable enough. The 4mm wire had a breaking strength somewhere in excess of 1500kgs, so with two of them, it would have been a bit over kill, and harder to work with. The thinner stuff is probably still way over 300kg each and even if one breaks (it shouldnt) it'll hold everything on its own happily.

The wire goes over the wooden tower cap which is screwed into the steel.

At the steel handle end a bottle screw attaches to the eyelet and a shackle attaches the wire which has been properly crimped into an eye to the screw. At the other end the shackle attaches direct to the eye without a bottle screw.


The cables sag down over the tower before being tightened.

Afterwards the wire takes the weight of the jib and adds a slight upward curve. once the camera head is attached the wire can be tweaked to give the right level of support. For now i'm running the cable slightly tight to see if there is any excess stretch and how much it'll move.

The last thing is to cut the metal brace to make room for the parallel bar which keeps the camera head frame level. One side is done, the other side needs doing and then the uprights can be attached to the pivot and the bar tested.

With a bit of luck it'll be ready for November, but with shorter nights its not looking quite as likely now.
The Jib - Rear section
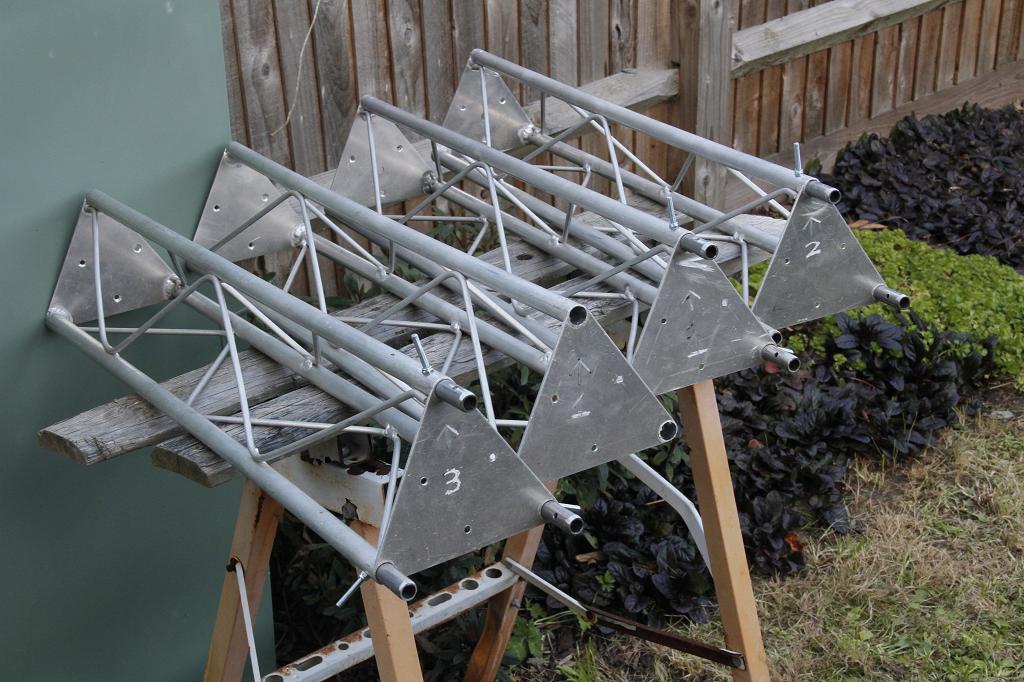
Because each piece is slightly different they're numbered on the end so its easier to fit them together in a hurry.
The truss mounts onto a steel back plate which is welded to some box section and has 2 pivoting pieces. I thought i had a few more pictures of the rear section before it was welded up but apparently not. Its made from 1/8" 2" x 3" steel box section and 1/8" plate from the top brace, truss plate and the pivot reinforcement/tower support.

Fortunately, while I was doing things, Dave (http://www.davidportass.co.uk/) took a load of pictures as well as helping with the build so i actually have some that are both useful and look awesome.


The main pivot was drilled in stages due to the thickness (1/4" each side) and then fitted with the original 14mm bolt form the wheel (160mm pivioting rubber castor).


The pivot plate will eventually be mounted on to either a large camera tripod, or on to a custom tripod support. With the truss clamped to the steel the jib starts to look like a proper jib!


Thanks also to my dad and to Lee for helping with the test fit.

The truss already has some holes drilled in the end plates, however these aren't really sufficient in my opinion, so a new set of 6 holes (2 down each side).

The drill and press are actually older than I am and got passed down when the home workshop got upgraded with bigger and better toold. Not having a garage or a shed of any size my workshop has to be flatpacked into a cupboard when i'm done so this is about perfect.

The wires for supporting the truss need to go over the central column once its raised, instead of cutting into the steel to make notches that will either wear the tower or the wires, an oak cap fits in. Considering it was made 300 miles away and posted down without being able to do a test fit, its pretty much spot on.

Rounding the inside corners all thats needed and it fits in tightly. The two grooves will take the wires and stop them sliding off the side of the tower. A couple screws in the side and it wont pop back out.

More soon!
Friday, 15 July 2011
The Jib
For a while now i've been wanting to make a camera jib, after a couple tests and some mockups I got some cheap lightweight truss on ebay. Each piece is just over a kilo, 81cm long and 140mm on centre to the tubing.
 | |
| Truss! |
 |
The end plates have holes in them, but none of them actually line up with eahc other, some are close, but arent exactly ideal.

 | ||
| Not what i'd call accurate :| |
For the first test the holes were matched as best as posisble and drilled out from M4 to M5 so they lined up properly. With everything bolted together, there was still some flex in the joints and the alignment still wasnt perfect.
New plan, fabricate something similar to an egg.
 |
| A raw egg, honest |
Instead of using the plate as the joining surface, making a spigot or egg in each tube will drestically improve strength and the stability of the jib. Fitting them is a pain as some of the tubing had been knocked over the years so wasnt round in places and has to be fixed first. The holes also need to be fairly accurate, and in lieu of a large drill press, this will have to do:

Not exactly high tech, but it works. The drill and stand are about as old as i am.

The eggs fit permanatly in to one piece of the truss with an M5 bolt and a locknut as they'll likcely not need to be removed often or hopefully at all once finished.

The other end has to be tapered so it'll fit easier in to the next piece of truss.

This is what happens when a drill bit explodes, i didnt find any of the other bits. This was the 3rd drill bit of the day to be broken or ruined, although the only one to spontaniously atomise in use (one was blunt within seconds, one snapped in half)


Few hours work in total, all the bits join together and its amazingly rigid compared to how it was. Next stop, the pivot and counterweight-come-handle end.
Subscribe to:
Posts (Atom)