Showing posts with label diy. Show all posts

Monday, 18 April 2016

Pallets of Veg. - Pt 2

The veg patch got more sides, but instead of making each piece fit in place we did some planning! 

The second bed needs completing and it was worth a shot at making up a whole side as a single piece first and then putting it in place. Sort of a good plan, but it was substantially harder to hammer into the ground, purely because it's harder to avoid the random deposits of rocks and stones underneath the grass.


The next bed, down the side of the house framing the path from the gate was made in a few pieces instead and knocked into an existing trench (made by removing the stone edging) and then backfilling slightly.


Far easier, still not as easy as building it in place a piece at a time, but that's much more time consuming, so either way, nothings perfect. Perhaps a bigger hammer...

Our landlord happened to have a greenhouse going spare during some improvements of his own so we carried it (without the glass) over the hedge into our garden. Back (as we've found out since) to within a few feet of where it was removed from this garden to his years back.

The frame is sound, but covered in moss. The glass was partially out and needs a good clean too, not to mention a few panes are broken so need replacing.


After a good cleaning though, the frame came up really well.


The harder part is laying a brick foundation into the grass, which every few inches has what seems like a thousand stones. At times, it'd be less rocky doing this on a beach. Still plenty of pallets left, probably make a floor, rather than making a flag floor and fitting that in nicely.


Monday, 28 March 2016

Pallets of Veg. - Pt. 1

When I lived in Padworth we had a veg patch, and it grew a decent variety of things, but it wasn't all that big, nor was it ideally placed for the sun (shadow of the house from about midday passed right over it). 

The new place has a much bigger garden, and it's mostly laid to lawn, but it gets a HUGE amount of sun. There's a wall to give a bit of shade to some of the plants, but  enough room to move things around. Plus there's the side of the house to the left which is south facing and should provide suppoirt to the taller plants with some trellis.


Theres what used to be a border, but is now something of a desolate wasteland to the side by the house which is going to get pulled up and raised if we get enough pallets.


We got enough pallets.


The first set went in slowly, digging holes for the posts and backfilling where the edging used to be (Yeah, there was edging in the first shot of the other side of the 'path'). And there were stones. So. Many. Stones. In the end a new tactic of chop the uprights into points and hammer them in where they needed it with the siding knocked into the softish earth. Waaaay faster.


The second bed was started in the same manner, begin with the 'path' edge (spot the trench) about a meter long and then work along the longer edges to the wall.


Not bad for a days work collecting, breaking down and shopping. I've sourced a local guy with topsoil as well which is handy. Next jobs are turn over the grassy areas in the beds, and finish the last side of the bed. then do the other side of the path.


The reclaimed edging even has a plan, if the landlord is happy enough to go with it and I cna cheaply find the materials. Pt. 2 to come soon if the weather holds.

Wednesday, 13 January 2016

Smoker advances

Another post from history, last time I used the smoker, while it was cooling down the lower saucer cracked, and then shattered into 3 bits. Somewhat annoying but not 100% unexpected.


The solution fixes two problems with the smoker. The first is that the fire is a bit higher, hence further from the saucer and less likely to be badly affected by the intense heat.


Secondly, the pot feet lifting the saucer create a gap around the whole circumference of the fire tray allowing loads more air into the base of the fire. This should (when properly supervised and fueled) keep the fire burning more evenly and effectively.


The first firing was pretty good and using a bigger joint (2.25kg, instead of about 1-1.5) it took around 6-7 hours to almost completely cook the pork shoulder. It was  still a little pink/juicy in the very middle so we finished it in the oven for half an hour, which was probably a bit too long. The flavour was good too, using mostly applewood, and some oak when we ran out.

Wednesday, 8 October 2014

More creative kitchen storage [Backdate]

One of the problems with renting is that you can't really do much to the house to make life easier like you would if you owned it and could change things a lot more.

Most modern kitchens come pre-drilled for a lot of different handle positions. if it's done carefully you can sometimes use the holes and it won't leave any lasting marks/damage that weren't already there (to some extent).


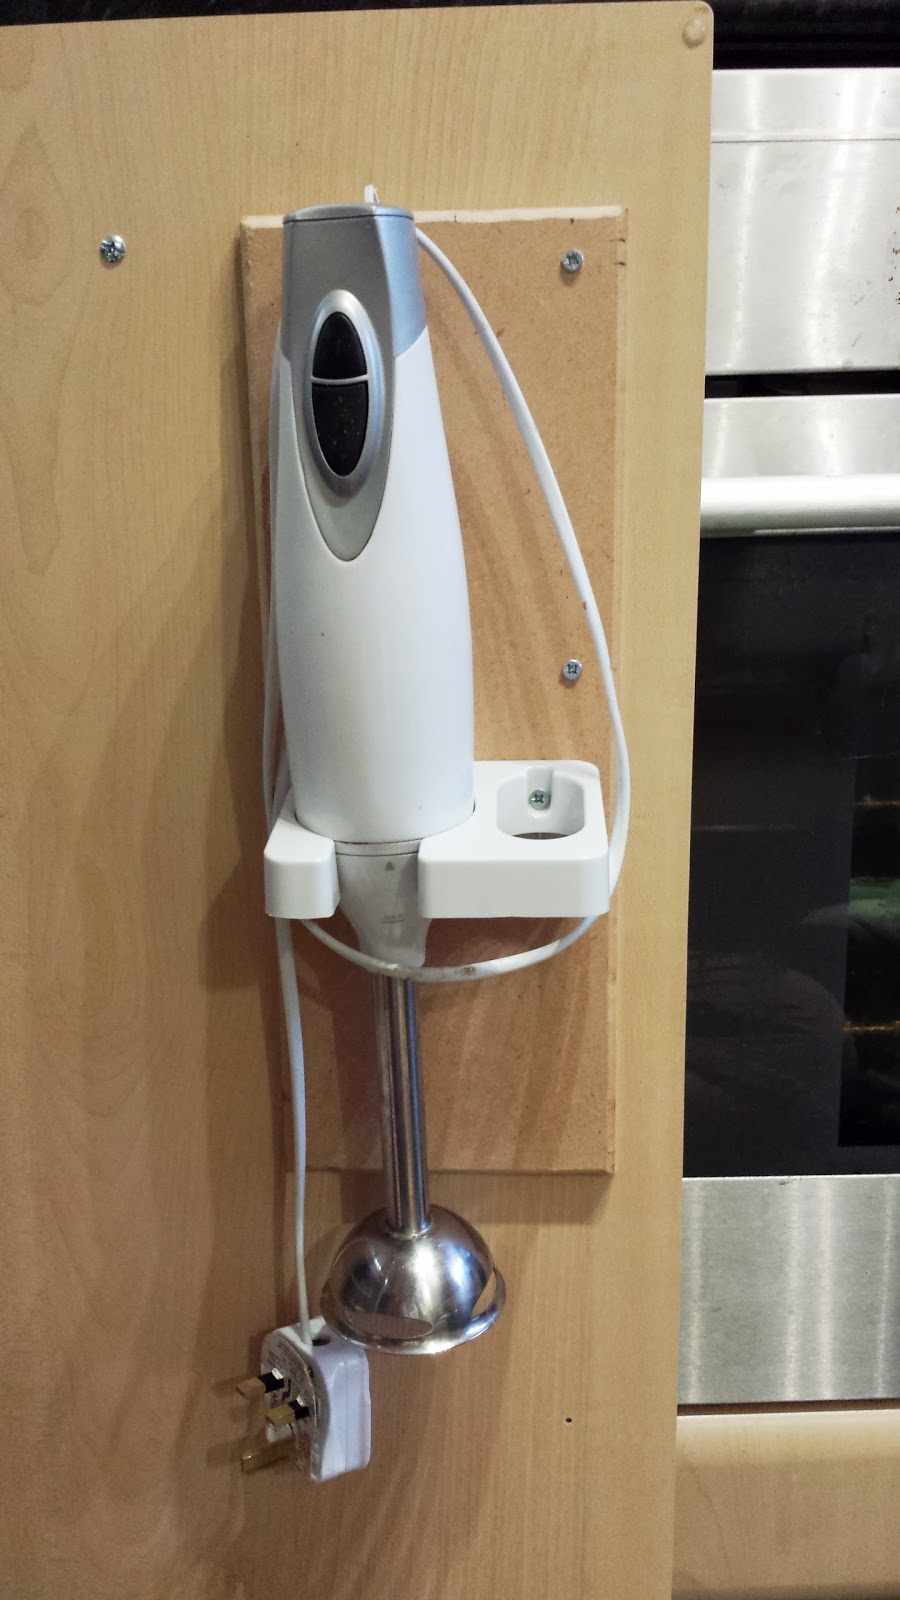
The stick blender I got a good while ago came with a mounting bracket, but it's been in a drawer pretty much since then.


The holes already in the door are pretty useless to mount to as they are spaced wrong and too high to allow the door to open. I had a scrap piece of MDF which was about the right size, albeit a bit big, it'd at least stop the head of the blender hitting the door and potentially marking it.


The holes were somewhat roughly aligned and drilled and using some of the smallest screws I had fixed to the inside of the door far enough in to avoid the frame of the cupboard.


The blender mount screwed on again, using some ridiculously tiny screws which really didn't look like they were going to hold


[Update]
With the power of hindsight, I can say that yes the screws held. It's a shame the new place has much older units drilled only for what was needed and despite their apparent, imminent replacement once I move out (there was a massive pile of kitchen units in the garage when I moved in) I'll not be risking it.
[Double Update]
Now with another house move in the way, maybe this can be done again.

It's been a month!

One month into the new place and getting everything back to where it was before had been a mission. With the likely short time here, a lot of projects are a bit lacking in purpose so anything thats being done is limited to things which will move with me to the next house.

While I get round to starting the various ones I can do, I'll post ones from the last place which were at least useful in some way and will probably be repeated when i move somewhere more long term.

The biggest of these will likely be the Camera Jib (from waaaay back), the Golf and some stuff on the desk. There'll probably be more when i remember things I need to do.

But first, flash backs!

Friday, 15 August 2014

Golf Boot Floor v2

Since the last time I cut up the floor the golf hasn't actually run much at all, but thats not down to the floor being missing, far from it. But with that being said the intention is to take this to an event later this year and that means moving a good amount of gear around with it. So it's back to the flooring over the spare wheel for another go.


First off, a template around the rear wheel arches inside to transfer to some 3mm plywood sheet. With the extra weight, this should hold up better than the hardboard did and the whole unit should come out if I really want to go lightweight.


First edge cut...


...and it fits! almost on the first go anyway.


The second edge is cut and with some fine tuning it fits too.


The back of the board has to be cut to fit around a small brace and also just about allows for fingers to lift it with ease.


After a long time thinking about how to do this I had a kind of eureka moment and disappeared into the house and wandered about muttering to myself for about 20 minutes while my dad and girlfriend didnt really know what I was doing.

Using some old Ikea brackets and a dremel I fitted them over some screws meant for the rear seats and wound a wing nut on to hold it in place.


The next part of the epiphany was using some 100mm box trunking as the front support instead of wood. I was going to use wood but it'd be heavier and I didnt have it on hand. This was lying around and had been for a couple years or more.

Some quick cuts with the Dremel to get over the wing nuts and it's ready to fit.


The box section is held on with two screws and a thin strip of wood behind for them to bite into and hopefully not strip. So far so good, the washers work well to spread the load and nothing broke.


The completed, as yet uncovered floor.


And from the other end behind the passenger seat.


Underneath there are a few pieces of pine to add some front to back and a piece wider than the sunken floor so it stays at the right level behind the rear lights.


Next job for this is to cover it and try it out.

Wednesday, 11 June 2014

Organise ALL THE THINGS

Now that the extraction is basically sorted in the garage, there's a new problem to be addressed. There never seems to be enough space to DO anything when you want to, because theres so much stuff, and it's typically badly organised from years of being put away in a hurry to do something else 'now'.

After getting a new and somewhat larger band saw, things came to a head when the old one had to move to make room for the new one. The problem being that the old small band saw stood on a table which was later made into a wood store for all different types of wood, and as the collection of bits increased it just got worse.


This is all of the wood which isn't a large sheet piece and was under the benches in various piles. There's Oak, Mahogany, Ash, Walnut, some plywood and chipboard of  various thicknesses and coverings to name only the more common ones.


The old band saw stand was also one of the supports for the main bench top down that side of the garage, not especially helpful when it needs to be removed.


Because the legs themselves were perfectly serviceable, and also held up the shelf that the thicknesser was on, making a new set seemed a bit annoying. Making a filler block and end cap instead to make up the gap was far easier and still did the job. A little hacky, but if it's stupid and it works, it's not stupid.


In a spree of efficiency I also decided to start clearing out ALL of the tools on the other side and reoganising them so they actually worked in a sensible manner. Because of the speed of doing things and trying to finish as much as possible in a short space of time, picture taking fell a little by the wayside while problems were overcome.

On the left of the picture, just visible are some metal shelves, which when they were installed were sufficient as there were fewer tools overall. With the number of tools increasing and 1/3 of this are being taken up by a router table and the shelves being removed, everything was crammed down.

For years the intent has been to make a sliding shelf, and now the time had come, basically because I got sick of moving the rails around the garage and saying "these should be used..."

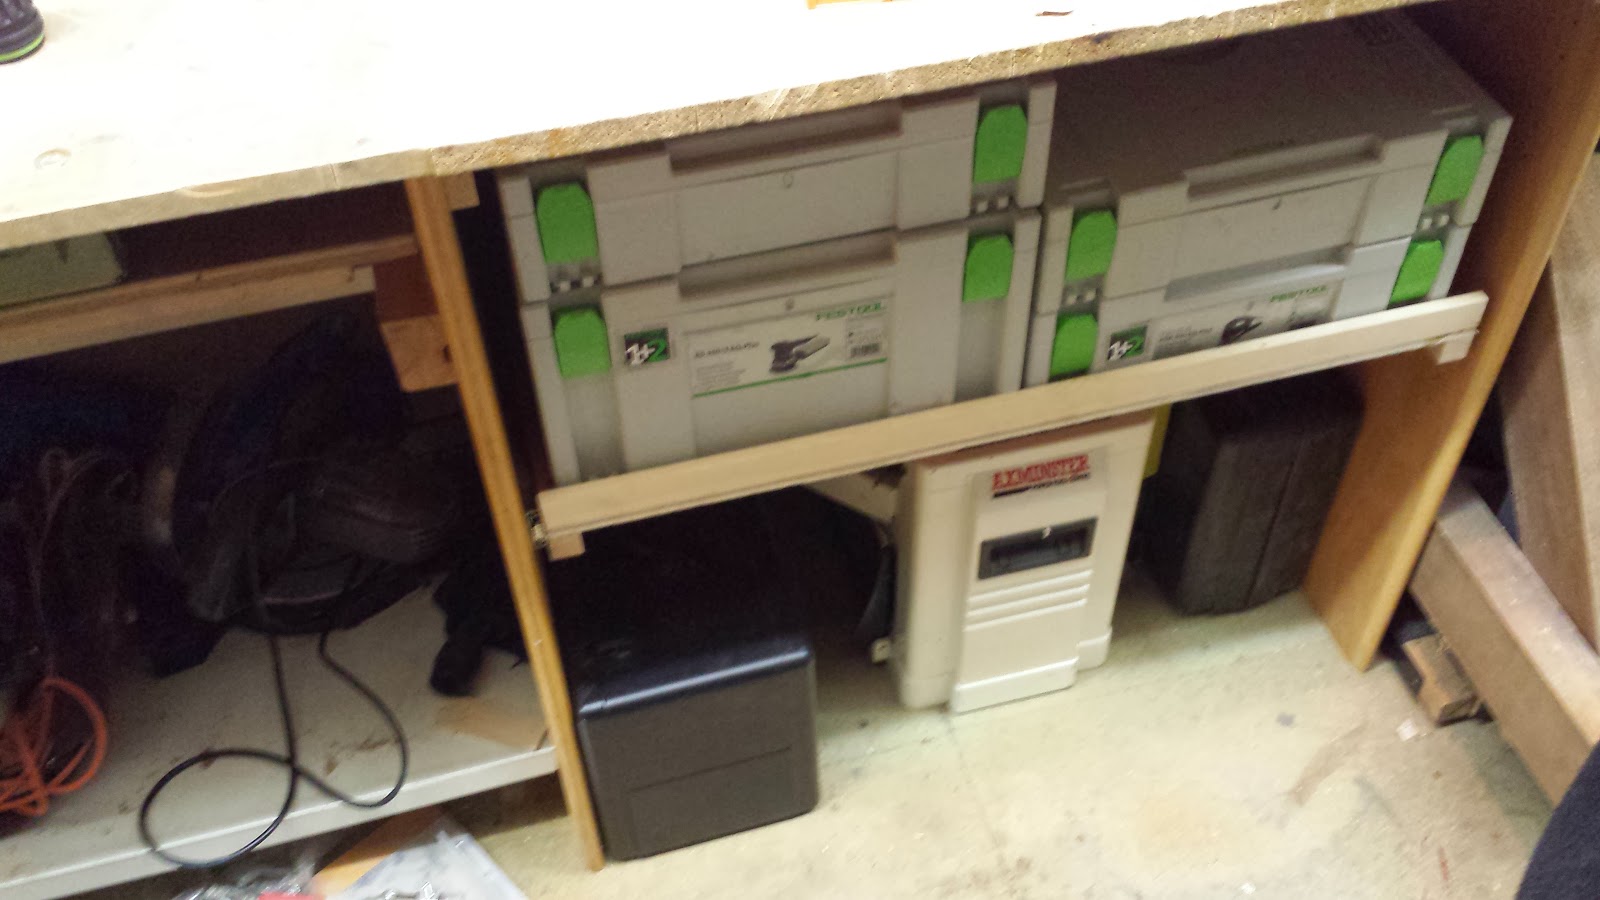
So, a shelf was made to carry all of the Festool boxes since the stack and lift so well, underneath went the router, the thicknesser and the biscuit jointer.


Behind the Festool as the shelf is roughly 24" deep goes the nail gun, the hammer drill and mains screwdriver, circular saw, and an exact-saw, which is pretty handy plus a case of bits.


The space to the left has also been redone, but i'll put up photos of that another time, once i've taken them.

Tuesday, 13 May 2014

Further Extraction

The first part of this project got piping most of the way round the garage and a lot of the more difficult sections in place. Once the pipe was extended along the other side of the garage as well, there was still space for the pile of clamps that usually fall over when trying to take one to be stored properly underneath. 


In addition the down pipes for the tools were added and the blast gates installed.


The gates allow air flow to be controlled so only one part is open, allowing maximum extraction from which ever tool is being used. It's possible to close the whole system off, but it's not really helpful...


There are a few more things to be added like a split pipe to the tablesaw to draw dust from the back of the blade near the riving knife, as well as a better means to collect dust from behind the radial arm saw.


Wednesday, 7 May 2014

LAN In A Box - Part 10, The Cable Finale (Almost)

The last of the cabling took two sessions and actually went pretty quickly. So much so I didn't take that many pictures because it didn't seem interesting enough. 

Here's some patched cables.


Here are all of the patched cables.


There was one minor flaw I noticed really a little late in the day. The new patch panel has it's holes at the outer edge of the U. The old on didn't and had it's mounting holes in the center of the U. As a result, next time the sides pieces are out they'll have to be redrilled for the new panel, but fortunately it's hardly impossibly difficult to do.


This was mean't to be the last update before the first sue of LIAB in the wild, but the PSU died while trying to install the OS so delayed everything, the network side will be ready, but the server itself is probably going to be done at the event.


Friday, 2 May 2014

LAN In A Box - Part 9, Power Up!

 I forgot to take a picture of the brackets for the power supply, but they weren't really all the interesting to see being made. They're more spare aluminium bend round and hammered to fit closer, then screwed and pop riveted into place to allow it to be removed, but still held securely, even to the thin ply on the back.


One thing I had forgotten to do earlier was make the hole for the power cable to actually get to the PSU, as well as the Wireless AP.


Forstner and Festool bit to the rescue! One wasn't enough, so had to double up and make it wider for the kettle plug to get through.


The ideal position for the AP had to be near the top as the box was going to be on the floor, having the AP on the floor wasn't going to help a great deal.

Mounting it at the top in a position where the antenna can fold up also kept it well out of the way of everything inside knocking it when packing. After finding the position where the antenna flipped up and didnt hit the front/lid I made a shelf when a couple of notches to locate the feet of the AP.


The shelf fastened to the side of the box...


And the AP sit's on top. The only down side is that the AP can still fall of the shelf and there's no easy way to fix the AP from underneath without damaging the casing itself.


The solution is a hook shaped bracket, which in retrospect didn't need to be hooked, it could have been a loop as it has to be unscrewed to remove the AP anyway, but never mind.


Here, the antenna is up and the AP fully mounted the the door roughly in place with no collision.


With all the main hardware mounted (at least that I had at the time), one major thing remained, how to power the server on. Quite a few years ago I started making a server case from scratch using aluminium L section and a lot of head scratching. It had a few neat features, one of which was a toaster-mount dvd drive in the top of the case.


 Because the server case took longer to make than it had a use for (I went to rack mounting for my servers) the Buglin switch i bought never actually got used for more than testing. This seems like a good idea to use it, rather than it just sit in a box.

The switch itself has a thread shallower than the thickness of the wood, once again forstner bits to make the hole and recess sorted the problem.


And mounted!


Made a lot of progress in this visit to my parents, back to the homestead to continue with cabling, order parts and setup the server. Unfortunately the spare PSU I had only has a 4 pin 12V connector to the motherboard, but the board itself has an 8 pin. Will be buying an adapter for 4-pin and molex to 8pin connector soon.